How to Link Your Existing Shopify Products for Fulfillment
So, your Shopify store is connected, congratulations! Now comes the important part: Linking.
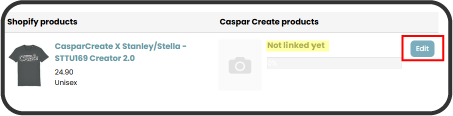
When you first connect, your Caspar Create dashboard will show a list of all your existing Shopify products. At first, these will appear as "unlinked." This just means we know they exist, but we don't know which Caspar Create item (like a specific tote bag or t-shirt) they correspond to yet.
.png)
Follow this guide to "map" your products so that when a customer buys from you, we know exactly what to print and ship.
Step 1: Find Your Shopify Product List
-
Log in to your Caspar Create Dashboard.
-
Navigate to the Account > Integrations > Shopify > Link Products
-
Here, you will see a list of every product currently live in your Shopify store.
Step 2: Assign a Caspar Create Product
Find the product you want to automate and click the "Edit" button.
You now need to tell our system which blank product from our catalog matches your Shopify listing.
-
Click "Link".
-
Choose the corresponding item from our catalog.
.png)
Step 3: Map Your Variants (Size & Color)
This is a crucial step to ensure your customer gets exactly what they ordered.
-
Match your Shopify variants (e.g., "Anthracite / XXS") to the Caspar Create variants.
-
Pro Tip: While our system tries to auto-fill these details, always double-check them. Ensure the colors and sizes align perfectly to avoid fulfillment errors.
.png)
Step 4: Upload Print Files & Mockups
Scroll to the bottom of the page to provide the "blueprints" for your product:
-
Print File: Upload your final, high-resolution design. Make sure it fits our print template (check measurements of Design Area). This file is what we use for actual production.
-
Product Mockup: Upload a mockup image. This serves as a visual guide for our production team's Quality Control to ensure the print placement matches your vision.
.png)
Step 5: Save & Confirm
Click "Save." You will be returned to your products list and see a progress bar appearing for that product.
-
Aim for 100%: Ensure the bar reaches 100%. This confirms that every single variant (every size and color combination) is correctly linked and ready for sale.
.png)
Pro Tips for Mockups & All-Over Print (AOP)
We want your store to look professional. Here is what you need to know about using images:
1. Using Your Own Mockups
You are more than welcome to keep using your existing Shopify mockups! As long as they accurately represent the product we are fulfilling, there is no need to change them.
2. Generating New Mockups
For standard DTG (Direct to Garment) or Embroidery items (like Stanley/Stella tees):
-
Upload your design in our Product Editor.
-
Simply download the generated mockup directly to use in your store.
.png)
3. A Note on All-Over Print (AOP) & Aprons
Our All-Over Print Product collection is a premium, complex process.
-
The Current Status: The mockups in our editor for AOP items are currently for placement preview only. They may show small visual imperfections (like missing straps on the apron) or placeholder text.
-
Our Advice: We are working hard on upgrading these! For now, if you want high-quality photos for your product pages, we recommend using your own photography or external mockup tools. We’ll notify you the second our high-res AOP mockups are ready for prime time.
Need help with a specific product?
Linking can feel a bit like a puzzle at first. If you’re unsure if a variant is mapped correctly, don't hesitate to reach out to our support team!
All linked up?
Your existing catalog is now automated!
-
Want to add more to your collection? Learn How to Create & Export New Products directly from our dashboard.
-
Seeing "Out of Stock" in your store? Don't panic! It’s a quick fix. See how to update your Shopify inventory settings here → Why are my Shopify products showing "Out of Stock"?